Simple Jon Boat Plans for Beginners with No Experience
Simple Jon Boat Plans for Beginners with No Experience
Constructing a jon boat, a simple flat-bottomed boat, can be a rewarding project even for individuals with limited woodworking experience. This comprehensive guide provides detailed plans suitable for beginners, emphasizing safety and practicality throughout the construction process. While prior experience is not a prerequisite, a methodical approach and adherence to safety guidelines are paramount.

I. Preliminary Considerations and Planning

A. Material Selection
Choosing the right materials is critical for the structural integrity and longevity of your jon boat. Marine-grade plywood is strongly recommended due to its resistance to rot and moisture damage. Consider a thickness of at least ½ inch for optimal strength. For the boat's frame, select pressure-treated lumber, specifically designed to withstand prolonged exposure to water. This will prevent premature decay and ensure a robust structure. Avoid using untreated lumber, as it is susceptible to rapid deterioration in aquatic environments.
Fasteners are equally important. Opt for galvanized or stainless steel screws and bolts to resist corrosion. Ordinary steel fasteners will rust quickly in the moist environment of a boat, compromising the structural integrity of your vessel.
B. Design and Dimensions
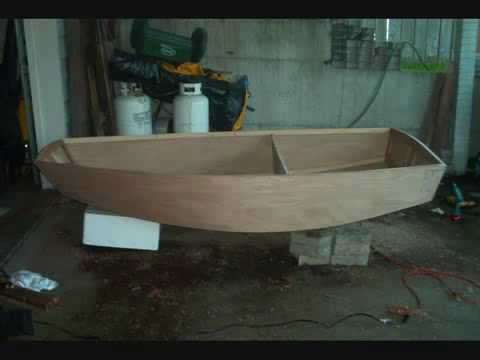
This plan outlines a small, manageable jon boat suitable for beginners. The dimensions are approximate and can be adjusted based on your specific needs and available materials. However, maintaining proportional relationships between dimensions is essential for structural stability. A recommended size is approximately 8 feet long, 3 feet wide, and 1 foot deep. These dimensions provide ample space for one or two individuals while remaining manageable for construction.
Detailed drawings, including precise measurements for each component, are strongly recommended. You can either create these yourself using CAD software or utilize pre-existing plans available online. Remember to account for material thickness when creating your plans. Accurate measurements will significantly improve the final product and avoid costly mistakes during assembly.
C. Tools and Equipment
Before commencing construction, assemble the necessary tools. This includes:
- Measuring tape
- Pencil
- Circular saw or jigsaw
- Drill with various drill bits
- Screwdriver (preferably cordless)
- Clamps
- Safety glasses
- Work gloves
- Wood sealant
- Marine-grade varnish or paint
- Sandpaper (various grits)
Ensure that all tools are in good working order and that you are familiar with their safe operation. Improper tool usage can lead to accidents and injuries. Consult a professional or refer to the manufacturer's instructions if you are unsure about how to use a particular tool.
II. Construction Process: A Step-by-Step Guide
A. Building the Frame
The frame provides the foundational support for the boat's structure. Begin by cutting the pressure-treated lumber to the dimensions specified in your design plans. Precise measurements are crucial at this stage. Assemble the frame using galvanized or stainless steel screws, ensuring that all joints are secure and properly aligned. Consider using wood glue in conjunction with screws to enhance the strength and durability of the joints. Cross-bracing is vital for structural rigidity; incorporate it strategically throughout the frame. Reinforce critical areas such as the bow and stern for added strength.
B. Attaching the Plywood
Once the frame is complete, carefully attach the marine-grade plywood to the frame. Pre-drill holes for all screws to prevent splitting the plywood. Work meticulously, ensuring that the plywood sheets are aligned precisely with the frame and each other. Use ample clamps to hold the plywood in place while screwing it to the frame. The use of sufficient clamps will prevent the plywood from warping or shifting during the fastening process, maintaining the integrity of the vessel's form and creating a strong bond between the plywood and the frame.
C. Sealing and Finishing
After the plywood is securely fastened, apply a high-quality wood sealant to all exposed surfaces of the boat. This will protect the wood from moisture damage and prolong the life of your vessel. Allow the sealant to dry completely before proceeding to the next step. Once dry, apply several coats of marine-grade varnish or paint. This will provide additional protection against the elements and enhance the aesthetics of your jon boat. Allow each coat to dry thoroughly before applying the next.
D. Final Assembly and Testing
Inspect the completed boat meticulously, ensuring that all joints are secure and there are no loose screws or gaps in the plywood. Address any imperfections before launching the boat. Conduct a thorough test in a calm body of water before venturing into more challenging conditions. Start with a short, controlled test to assess stability and identify any potential issues. Gradually increase the duration and intensity of your testing as your confidence grows.
III. Safety Precautions
Safety should always be your top priority. Always wear appropriate safety gear, including safety glasses and work gloves, when handling tools and materials. Be cautious when operating power tools; never rush and always follow manufacturer's instructions. Conduct thorough inspections of the boat before each use, checking for any signs of damage or wear. Never overload the boat beyond its recommended capacity. Obtain proper instruction in boat handling and safety procedures before using your jon boat on open water. Always let someone know where you are going and when you expect to return. Carry safety equipment such as a life vest and a signaling device. When working with the pressure-treated lumber, follow any manufacturer's warnings or precautions about potential safety hazards.
IV. Conclusion
Building a jon boat from scratch can be a challenging but rewarding experience. By following these plans meticulously and adhering to safety guidelines, even beginners can successfully construct a functional and durable vessel. Remember, patience and attention to detail are key to a successful outcome. Enjoy the process and the satisfaction of using a boat you built yourself.